
Moto C (XT1750) USB Driver4 min read
How to Install the Moto C XT1750 USB Driver:
If you want to flash your Moto C XT1750, it’s important to first install a USB driver on the phone. This will ensure that the device will run smoothly when installing the custom ROM. For more information on how to do this, click on the links below.
Download Moto C (XT1750) USB Driver (Here)
Installing the Moto C (XT1750) USB Driver:
If you want to connect your Moto C to your computer via USB, you need to install the Moto C XT1750 USB driver.
This driver enables you to easily and securely connect your phone to your PC using a data cable. It is very simple and easy to download.
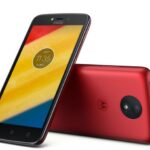
The Motorola Moto C XT1750 is a smartphone that runs on Android 7.0 Nougat. The device is powered by a Quad-core 1.1 GHz cortex-A53 processor. Additionally, the phone comes with 1 GB of RAM and a Li-Po 2350 mAh battery.
Moreover, the phone has a 5.0-inch display that supports 480×854 pixels. The device also features a 5MP primary camera and a 2MP secondary camera.
You can also root your Moto C. Rooting allows you to install applications and customize your phone.
Before you get started, make sure to have a functioning PC and a USB cord that works well. Then, go to Motorola’s website and download the Moto C XT1750 USB Driver.
Flashing the stock ROM:
If you own a Motorola Moto C XT1750, you may want to try flashing the stock ROM on it. This will help you solve various problems that you are experiencing with your smartphone. It also helps you restore your phone to its original state.
Stock ROMs have limited customization options. In addition, they are prone to bricking your smartphone. That is why it is very important to verify the correct firmware before beginning the flashing process. Moreover, you should have at least 70 percent battery charge to start the process.
There are many ways to install firmware on your Moto C XT1750. You can manually download the files from the official website of Motorola or from an online site where developers post custom OSs for their devices. However, you can also use an external tool, such as SP Flash Tool.
Before you begin the process, you should back up all the data on your smartphone. To do this, you should connect your phone to your PC using a USB cable. Once your phone is plugged in, you will need to hold the Volume Down and Volume Up buttons together until your PC detects it.
Rooting the phone:
If you have a Moto C XT1750 and would like to get the most out of your phone, rooting is a great way to unlock all the features of your device.
This process can also help you save some of your battery life. Getting your phone rooted may sound scary, but if you do it right, you’ll have complete control over your Android device.
The first step is to download a good rooting application. A great example is Framaroot. You will need to read the instructions and follow them closely to ensure that you don’t brick your device.
Once you’ve chosen your rooting method, you’ll have to wait a while for your results. It’s a good idea to make a backup of your phone’s data before you start because you don’t want to lose any important information.
There are several apps available on the Google Play Store to assist you with rooting your Moto C XT1750. Some of these include Magisk, SuperSU, and the TWRP Recovery.
Installing TWRP recovery:
TWRP recovery is a custom recovery for Motorola Moto C. This is a free and open-source application that is able to flash new OTA updates to your device, restore a full Nandroid backup, install custom firmware and root your phone.
Before installing the TWRP recovery on your AMERICAN MOTOROLA MOTO C WATSON XT1750, you will need to put the device into recovery mode.
The first step is to press and hold the Power and Volume Up buttons. After a few seconds, you will notice that the device will start flashing.
Next, you will need to enable USB debugging. You can do this by opening the Device Manager. Click on Add Hardware Wizard. From the Add Hardware Wizard window, click the Show All Devices option.
Next, you will need to download the ADB and Fastboot drivers. These drivers will allow you to communicate directly with the Android device.
Once you have these drivers installed, you will need to make sure that you have a Windows PC. Installing the TWRP recovery on your AMERICAN MOTOROLA MOTO C WATSON will not work without these drivers. Fortunately, these drivers can be found on the Motorola USB Driver website.
Warning: Array to string conversion in /srv/users/rasheed/apps/allmobitools/public/wp-content/plugins/neori-social-share-buttons/neori-social-share-buttons.php on line 37
Array